
How to use GelMap
Disclaimer
This disclaimer applies to software hosted on gelmap.de servers that is still in testing phase but utilizable by experienced users. This software has not been released for sale, distribution or usage for the general public.
By using this software, you are considered to have read this disclaimer and agreed to its terms.
The software is provided "as is" without warranty of any kind, either expressed or implied, including, but not limited to, the implied warranties of merchantability and fitness for a particular purpose. The entire risk as to the quality and performance of the software is with you.
It is therefore up to you to take adequate precaution against possible damages resulting from this software. Software in testing state should for example not be used on sensitive and/or valuable data.
If you are in any doubt of your capabilities to make such a decision, please do use software hosted on gelmap.de. In no event will we be liable to you for damages, including any general, special, incidental or consequential damages arising out of the use or inability to use the gelmap software (including but not limited to loss of data or data being rendered inaccurate or losses sustained by you or third parties or a failure of the software to operate with any other programs), even if we have been advised of the possibility of such damages.
Creating your own GelMap
If you want to use GelMap for your Data Analysis, you have to upload at least one image file and one coordinate file.
You can download an example set here
Image File
The image file must be a JPEG or PNG file that should not exceed the size of 2MB
The coordinates in the protein file must correspond to the image
Coordinate/Protein File
(When using Excel: Avoid special characters and exotic formats.)
You can export your coordinates directly from Delta2D
The second mandatory file is a table with your coordinates and protein data.
The first row is reserved for column titles. All other rows are interpreted as data.
Example
You can download an example set here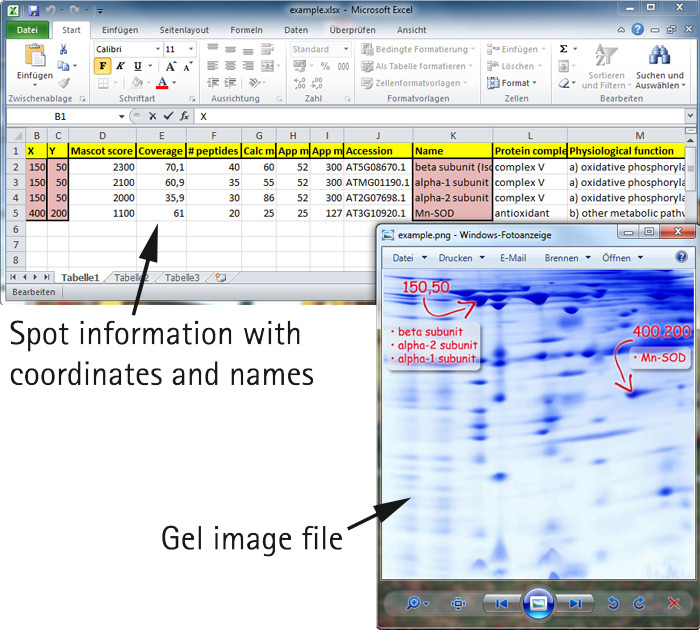
How to retrieve the coordinate file from Delta2D
![]() 1. Make sure you have spots on the image
1. Make sure you have spots on the image
To export spot data you have to either first detect spots on your gel image or transfer the spots from another image.
2. Open table for this image
Right-click on the image (either in the Project Explorer, Light Table, or Warping Setup window) and choose "Open Quantitation Table". Switch to this table.
3. Enable visibility of spot ID and coordinates
You have two options to control the visibility of spot attributes in your tables:
• In a certain table choose "Columns" and then click the entry that you want to show or hide.
• To control the visibility for any table, choose "Gels" > "Gel Image Visibility..." from the main menu and check or uncheck the columns that you want to show or hide. Please note that there are three tabs "Basic", "Advanced", and "Statistics": find "ID", "X", and "Y" in "Advanced".
4. Choose "Export" > "Export to Excel". In Excel you might have to enable macros. Then a new table is filled. Rename column "horizontal position on gel image (left = 0)..." to "X", "vertical position on gel image (top = 0)... to "Y", and "user defined label '...' to "TITLE".
5. That's it - you now have the basis for the mandatory coordinates file.